Syncing a Parity Archive Node: How-To
For my experiments, I set on having an Ethereum archive node (with the full history of all the states), with Parity.
The whole process was frustrating so I’m sharing what I would have wanted to know when I started. Also see the last part if you want to try a shortcut to avoid going through the whole process.
My setup
I did the sync on a good laptop, with a huge SSD:
i7-2720QM CPU @ 2.20GHz
16 GB of RAM
Samsung SSD 860 EVO 4 TB
Here, we are syncing from scratch so we have to replay the full history. An SSD is mandatory. And given the final size (that I didn’t really know beforehand), 4 TB is clearly recommended.
The sync was made with Parity 2.3 (nightly), with the following relevant options:
--pruning archive
--tracing on
--fat-db on
--cache-size 4096
The filesystem used was btrfs (because snapshots, see below).
How it went
Fun fact: Parity stalled after a few days (due to a bug), and I had to upgrade its version to nightly, were the bug was apparently fixed.
- Facts:
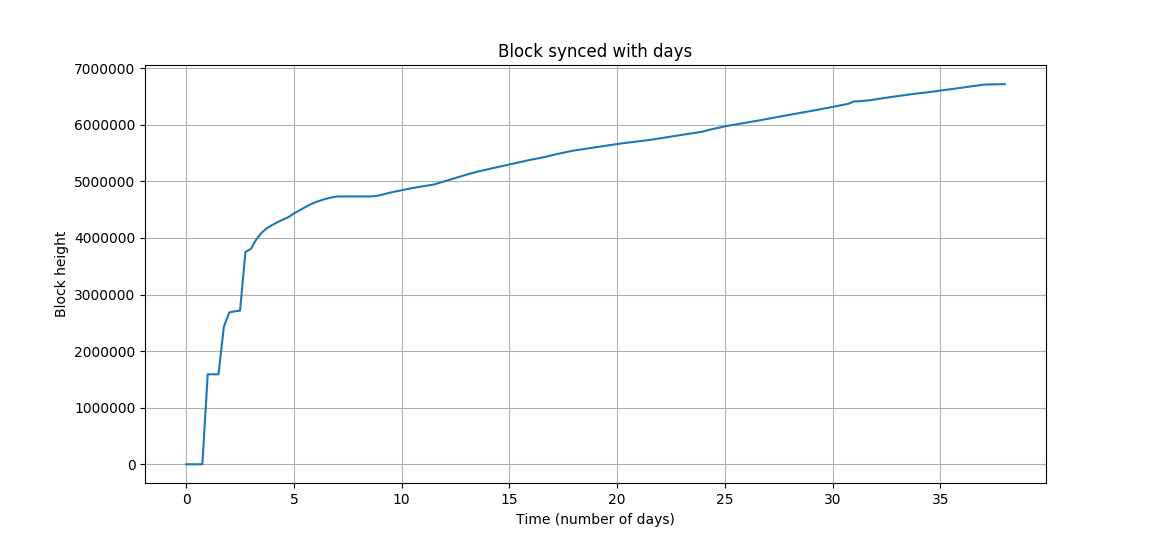
It took approximately a month to sync to block 6,700,000 (the block height at that time).
At block 6,700,000 the disk usage for my archive node is 1.8 TiB.
Total written to my SSD: 74 TiB (computed from the
Total_LBAs_WrittenSMART counter).
I highly recommend that you look at the guaranteed TBW (terabytes written) for your SSD: my 860 EVO is guaranteed for 2400 TBW which means that I consumed 3% of its guaranteed life (not too bad). But if I had a 850 EVO (guaranteed for 300 TBW) I would be at 25% of its guaranteed life!
You can see the block heigh with respect to time, in the following diagram:

The DoS attack (around block 2,700,000) didn’t take so long to process (only a day or so).
Unsurprisingly, most of the time is spent processing from the time where the network reached its capacity and the blocks were full.